Standing Desk: Why and How
Today’s blog post isn’t about coding per-se, but instead about life as a coder, and how switching to a standing desk could be a big win. I’ll cover why I made the switch, how I did it, things I learned along the way. At the end I’ll tell you how this all culminated in me designing and building my own standing desk, which is something I highly recommend (if you’re brave enough to try!).
This is a long post, so here’s the tldr: sitting is bad for you, standing is great, and building your own desk is very hard work but worth it in the end.
Why Stand?
If you haven’t heard, sitting all day is not good for you. If you want to hear all about it, I encourage you to check out the article about standing desks at the Wirecutter. The money quote:
“It doesn’t matter if you go running every morning, or you’re a regular at the gym. If you spend most of the rest of the day sitting — in your car, your office chair, on your sofa at home — you are putting yourself at increased risk of obesity, diabetes, heart disease, a variety of cancers and an early death. In other words, irrespective of whether you exercise vigorously, sitting for long periods is bad for you.”
Like most devs, I used to sit at the computer all day. But after a few years of steadily increasing back pain, I decided I’d had enough, and I started finding ways to stand. I’ve been doing it nearly full-time now for two years, and don’t intend to go back. In this article I’ll outline for you how I waded my way into the standing desk world, and eventually took the ultimate plunge and built my own standing desk.
Phase 1: Trial Runs
The first thing you’ll find when you start looking for a standing desk setup is that this is not as simple as running to Ikea or Staples and picking up a new piece of furniture. While standing at work is more “normal” now than it was a few years ago, this is still not “mainstream,” therefore most commercial manufactured standing desks are not cheap, $1000 + is typical as of this writing.
When I started thinking about standing I was not prepared to shell out over a thousand bucks to try this idea out. Instead, I followed the standing desk tradition of hacking together a standing desk. For me this meant setting a cardboard box on top of my desk, which became the keyboard and mouse support, and putting my iMac up on a shelf so the display would be at the right height for standing.
When I first switched to a laptop with an external monitor, I also found that a chair on top of a desk or table is often the right height for your monitor, then any kind of box will do for your keyboard / mouse surface. Creating a quick hack like this is one of the best ways to test this idea without spending too much money or time.
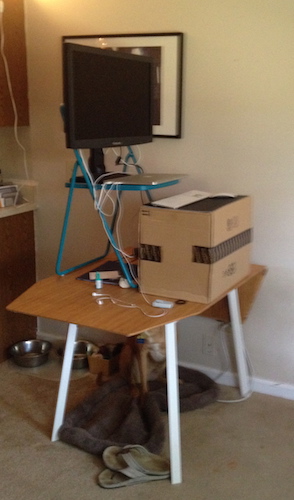
This difference between standing and sitting monitor height is one of the trickiest things about a standing desk setup - your monitor’s normal stand is almost certainly not going to be adjustable up to the height you need when you shift from seated to standing. If you don’t happen to have a shelf that’s just about right for you, you might try stacking books or boxes to give the monitor a boost instead.
If you’re working from home, pretty much anything that gets your keyboard to elbow height and monitor to “face” height will suffice. If you work in an office, they may not be ok with the aesthetics of a hack-desk. In this case I would recommend trying a standing setup at home for a while first, and plead the case with your office manager once you’re comfortable and committed to standing.
Ergonomic Requirements Gathering
There are two key ergonomic considerations for standing desk: surface height (where your hands go), and monitor height (where your eyes go).
In my experience, I found surface height to be much more important than monitor height. Surface height is also harder to adjust. Most sources I read recommend the surface be just below the height of your elbow. Make sure you’re standing up straight when you measure - you might be losing an inch or more to slouching and not even realize it.
Measuring is a good start, but the only real way to know the right surface height is to put together books and boxes and whatever other flat surfaces you can find and try standing and typing at different heights. You’ll probably find there’s a range of ~2” or so within which you’re quite comfortable. If in doubt, I would set your work surface to be on the high end of your comfort range. I find this makes me more conscious of standing up straight and helps me avoid slouching.
As for monitor height, generally you don’t want to be looking “up” at the screen. You’ll tend to be a bit closer to the screen when standing then you were when you were sitting, and you may notice (as I did) that when standing you become more aware of the size of your monitor and how much you have to turn your head to see things in the corners of it. Standing makes me more aware of how much I have to turn my head to focus on the sides or corners of my monitor, and how much it can strain my neck to do this for extended periods of time. I’ve had a lot less neck pain since I switched to standing, so I think that this is a win.
Between these two factors, in my experience the height and angle of the monitor are much less important than the desk surface height. Close your eyes, stand up straight, rest your hands on the keyboard in typing position, and then open your eyes and note where the center of your field of vision is. Put the center of your monitor there, about arms length away, and you should feel pretty good.
Getting comfortable
If you’ve never stood for long periods of time before, you’re going to experience some new sensations when you start. Your feet and knees might get tired. You may be surprised to find your quads or core muscles are a bit sore like they would be after a good workout in the gym. You may find you are hungrier than you were before.
This is pretty much the whole idea: your body expends more effort when you stand. What you should not experience is back and neck pain. There’s a real difference between muscle fatigue that comes from healthy exertion and muscle or joint pain that comes from unhealthy strain. If you’ve experienced both then I’m sure you’ll feel like I did: exertion fatigue is infinitely better than joint or muscle strain.
Most of this will go away in a couple weeks. You should find that when you stand you are not standing perfectly still, but are sort of shifting from side to side or even pacing just a bit. The more you move around while standing, the less stiffness or fatigue you should feel at the end of the day.
The best way to make sure you have success in the transition to standing is to get a good stool or drafting chair that you can use as part of your setup. Lean against the stool or take a break and sit in the chair some. This gives your legs a little break, and you’ll find you naturally shift and alternate between standing and leaning frequently, which is just more good movement and activity.
The worst thing I’ve experienced since I switched to standing desk is shin splints. This first happened to me when I moved and my office setup was on hardwood floors and not carpet. After 4-6 weeks in my new setup I started getting shin splints. I started wearing good shoes when I stand all day, and this mostly went away. Occasionally I get a little shin pain and after that I usually just take my laptop to a comfortable chair and sit for half a day or so, that little bit of rest is enough to get me “back on my feet.”
Phase 3: Cardboard-free solution
After working with my keyboard and mouse on top of a cardboard box for a while, I was looking for a way to improve my desk setup. Again, the key is just to find something that’s the right height for your hands. I noticed one day that one of our old dressers happened to be just about perfect for me, and repurposed it as my second standing desk.
In this case the dresser was an Ikea Hemnes 3-drawer, upon which I added a couple books and a desktop pad to add about half an inch for the keyboard height. I used a little step-stool as a monitor stand, upon which my 27” Cinema Display and MacBook Pro fit quite nicely.
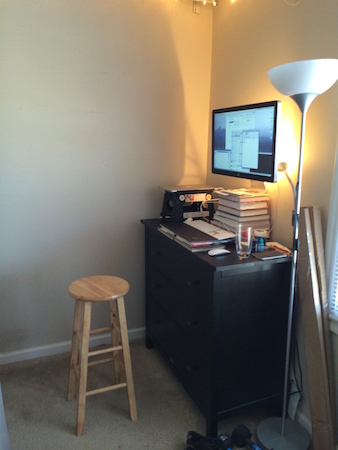
This setup served me well for about a year. As you can imagine, the big drawers in the dresser are an easy place to keep all your gear, and the monitor and keyboard sitting out on top of a dresser doesn’t really look that odd - as improvised standing desks go.
I was relatively happy with this solution, but the biggest drawback of it is your knees will bump up against the drawers when you take a sit-break on your stool, and that means you’ll hunch forward more than you really should.
So, I knew that I wanted to get a better, permanent solution. Looking at all the available options, though, I had a really hard time finding something that I thought looked nice and seemed reasonably priced. I loved the Tinkering Monkey Standing Desk, but I’m not in the Bay Area so that wasn’t going to be an option. So, in the tradition of hackers everywhere, I set out to make my own.
Phase 4: Design
Since I’d been standing for almost two years when I started this process, I had a very good idea of what dimensions would be right for me. I wanted a 40” surface height, and needed to raise the monitor base another 8” or so.
I went through a bunch of design iterations, originally intending to create something with a built-in monitor platform and some clever fold-out leaf that would extend the work surface. I modeled this in SketchUp, which is a fantastic 3D-drafting tool for this sort of thing.
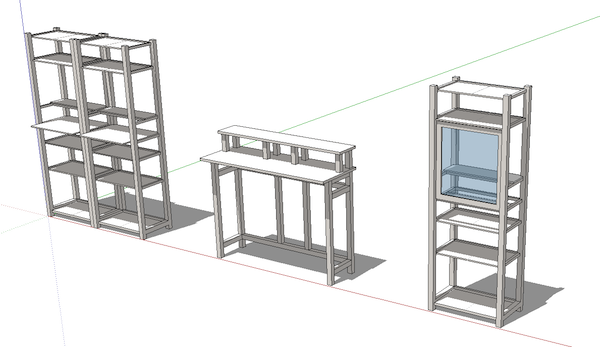
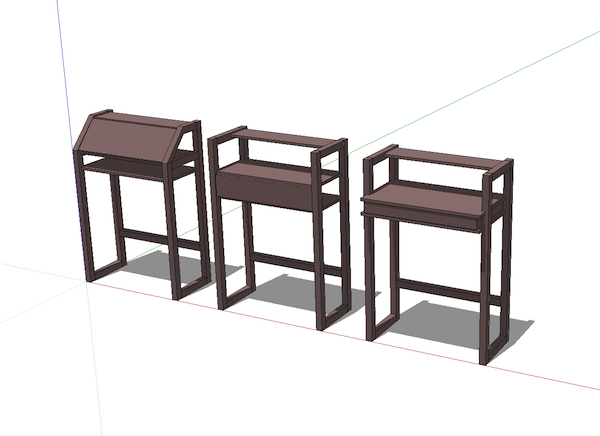
After consulting with some professional wood-workers about the feasibility of these designs, I reconsidered. First, building in a monitor platform means it may not be the right height if I get a different monitor in the future. Second, doing some complex fold-out surface is significantly more complicated than a flat surface, and as this was my first major woodworking project just doing a “simple” desk was going to be complex enough.
I went back to the drawing board and simplified the concept quite a bit.
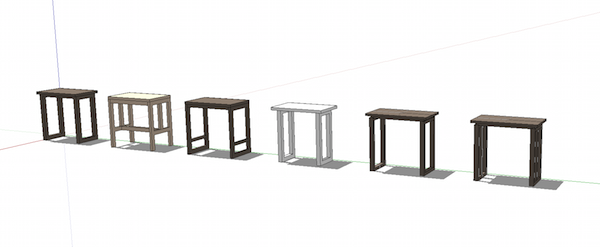
In hindsight, this was the best decision I made. The final design looked like this:
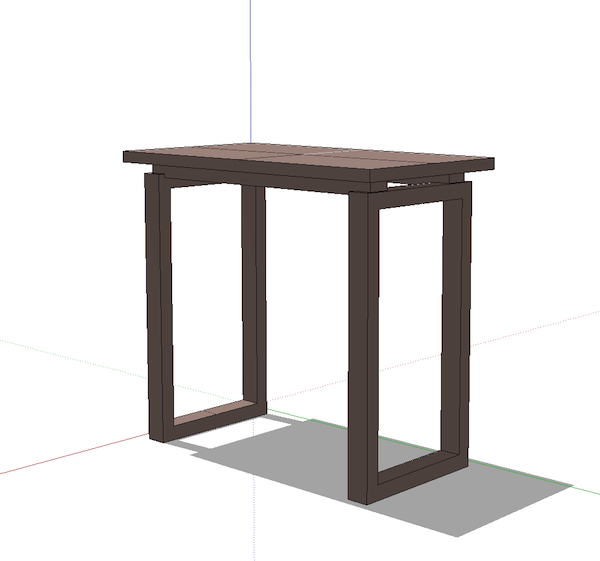
I originally planned for a 24x44” work surface. When I actually got in the shop and started cutting, I decided to go with a 25x48” surface. There’s a lot to be said for doing these things by feel, what you make in the shop doesn’t always feel the way you expected when you started out in the shop.
I wanted the desk to be a solid hardwood that would look nice and age well, so I went with American Black Walnut, which is pretty much a can’t-miss choice. You have to be a serious idiot to make something out of Black Walnut and have it not look nice. As merely a casual idiot (when it comes to woodworking), I liked my chances.
Phase 5: Construction
Walnut isn’t cheap, but I was able to buy enough rough lumber from a local reclaim shop to get the job done (about $250 for roughly 24’ of 8/4” rough cut).
I used three major tools to do the majority of the work:
- A joiner
- A planer
- A table saw (with mortise and tenon jig)
I don’t have these at home, but was able to use them at a nearby university craft center for a small fee. Lots of colleges have these. I’ve also heard of commercial wood and metal shops that will let you buy a studio pass to use their gear. If you’re in a major city or college town there’s a great chance you can find something like this near you. The other tools I used were very basic:
- Orbital Sander
- Power Drill
- Drill Press (but I could have used the power drill for all of it)
- Sandpaper
- Shop towels and sponges
- Screwdriver
- Socket wrench
I borrowed the orbital sander and I already had the drill. If you don’t own a power drill, screwdriver, and socket wrench (or, are not willing to buy them), this is probably not a good project for you :)
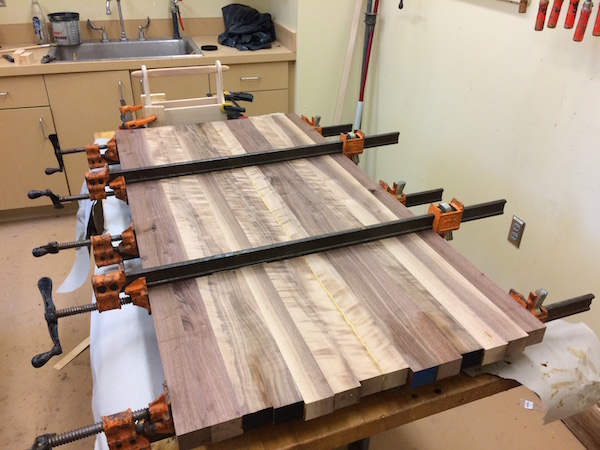
The first step was to join and plane the lumber down to dimensions I could use. For the table top this meant individual strips roughly 1.3” x 1.5” x 44”. I needed 14 strips total, which I glued together (short side to short side) and then cut to length to make a “butcher block” table top.
The second step was to make the crossbeams and leg beams, which I cut down to approximately 1.75” x 3”, varying lengths. This was the easiest step of the whole process.
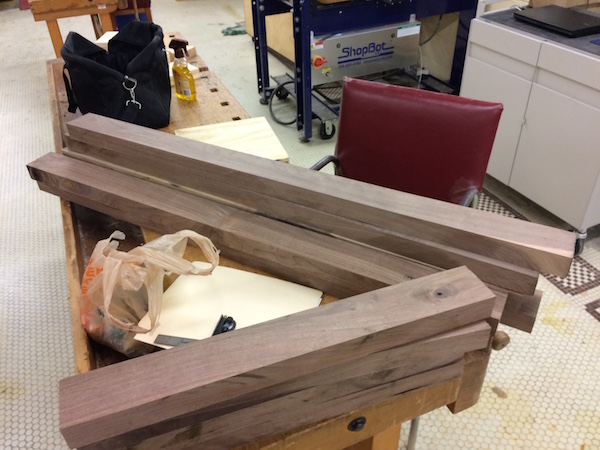
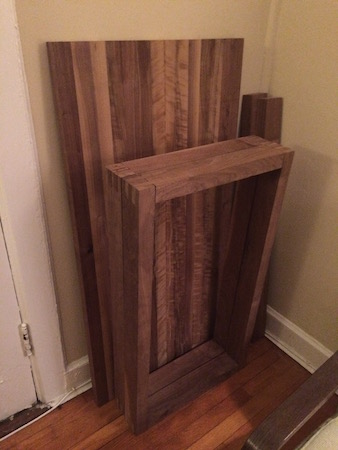
The hardest step was making the finger joints for the legs. I decided to make square legs for the desk which would be finger joined together. It took a lot of trial and error to make the finger joints. I intentionally left about 6-8” of “extra” length on the beams for the legs, which was really important as I screwed up at least eight times and had to chop then end off and try again. In the end I got the pieces so they would fit pretty snugly on their own, and then I glued them together to make the bond rock solid. Big lesson learned here: be careful with how much glue you use at this stage. It’s not easy to get the extra glue off the end grain of the wood when you’re done, so the less glue you leave on the ends the better.
The finger joints came out looking very nice, but it was a ton of work. If you want to save yourself some trouble, a simple four-leg table with the legs butt joined into the crossbeams would have been a lot easier.
One of the priorities for me was that the desk be able to be disassembled and fit into my car. I designed it so that the desk could be assembled from five pieces: 2 legs, 2 crossbeams, and the top.
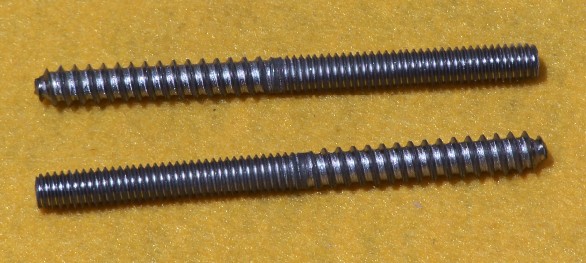
To join the legs and crossbeams, I installed two hangar bolts on the top of each leg, and drilled an appropriate bolt hole on the crossbeams so that I could attach a washer and nut on the other side, without sticking up from the beam. This allows the table to to sit flush on top of the beam, covering the bolt hole.
When the bolt is ratcheted on tight there’s very little wiggle in this desk, despite the lack of extra cross beams, so this aspect of the design worked out quite well.
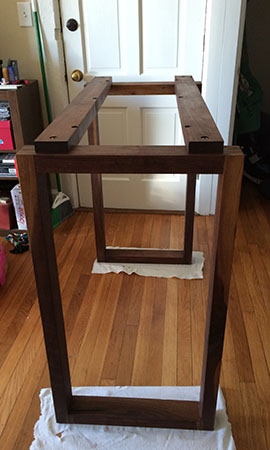
To attach the top to the crossbeams I used six desktop fasteners (aka “figure eight” fasteners). These allow a little bit of horizontal expansion and contraction. Installing these was among the trickiest details of the project: it’s easy to put them in the cross beams but it’s hard to position the desktop on them and be confident that you’ve really got it centered. I ended up being slightly off-center with two of the six pilot holes I drilled for this part, but these are small and hidden under the desk so I just drilled two new ones and the “mistake” holes are completely hidden by the crossbeams when the desk is assembled.
When it was all ready to assemble I finished it with Boiled Linseed Oil and Beeswax, which is sold commercially as “Tried and True Original Finish.” I also tested samples of General Finishes Arm-R-Seal and Watco Danish Oil. Arm-R-Seal left the wood looking closest to the original walnut color, and the Danish Oil finish was a little lighter with more of a rose color. I actually liked both of those slightly better color-wise, but since the difference was slight I decided to go with the “Tried and True” finish as it’s entirely non-toxic and food safe. I don’t plan to eat off the desk, but I can’t help but touch the surface all the time as I’m working at it, and the other finishes (as well as every other finish I looked at in the store) have big warning labels indicating they are not food-safe and contain “ingredients known to the State of California to cause cancer or birth defects.” Having read that about something I knew I’d be touching a whole lot, and having a 6 month old daughter in the house, I figured going with the non-toxic finish would be better for my peace of mind.
Final Results
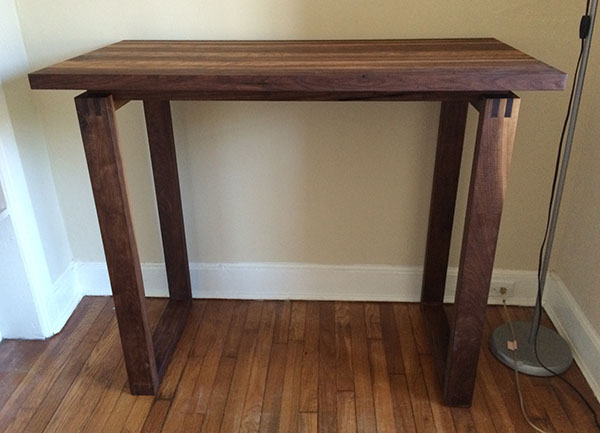
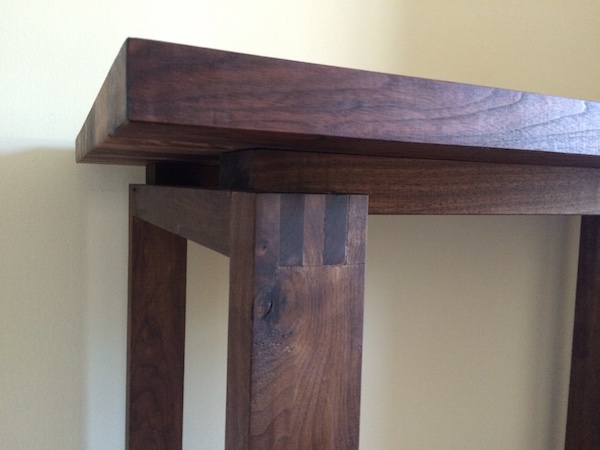
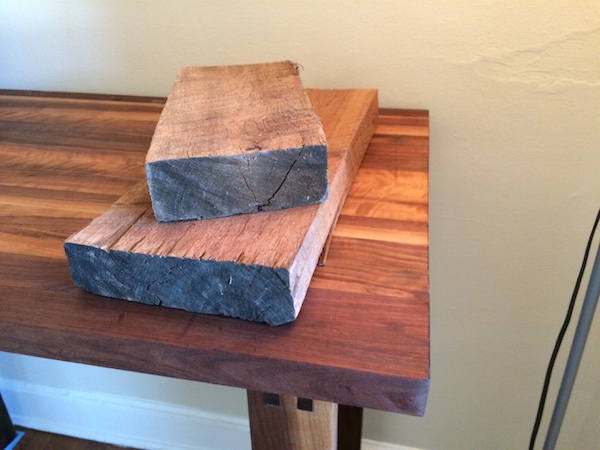
The final result looks very nice, and has earned me a lot of compliments. More importantly, it’s an excellent work surface that suits my standing work style perfectly. It’s exactly the right height, because I made it that way.
All in the project cost about $350 in supplies, and $100 for the shop pass. Considering I can continue using the shop for other projects, and many of the supplies are re-usable (like the new drill bits I bought), I estimate the hard cost of the project was really only about $300.
If you tried to buy a solid walnut standing height desk that was exactly the right size for you, you’d probably be spending more than $2,000 on it, so all-in-all I would consider this a great value on a piece of furniture that should last a very long time, in addition to being a fun project that I can brag about a little bit.
It took me about 3 months of Saturday afternoons to finish this. If I hadn’t tried to make finger joints and square legs, it would have gone about twice as fast. I like my design, but I certainly could have made it easier for myself, and I suspect the final result would still have looked great.
If you’ve made it all the way to the bottom of this blog post, you’re probably considering doing something like this yourself. If so, I’d encourage you to give it a shot! The best thing you can do to get started is to find a local woodshop where you can use the heavy equipment, and talk to the pros there. If you find a good shop with helpful pros, the rest is challenging but not overwhelming. Worst-case scenario, if you try and fail you’ll still come away with a better understanding of how furniture and other wood crafts are made, and you’ll have a much greater appreciation for the work involved when you see anything hand made out there in the wide world.
Cheers, and good luck!
